If you would like to view individual group contact details, perform the following:
1. Select your group from the ‘Message’ screen.

2. Click the “View Group” button.
3. The system will display the view group options. On this screen, it is possible to define which details you would like to view in the group list. The following options are available:
- List Title – provide a title for the contacts list.
- Notes – enter any notes that you wish to appear at the bottom of the contacts list.
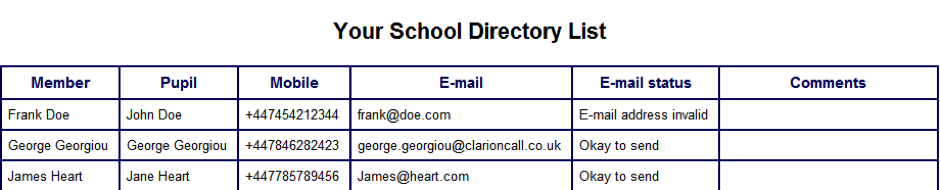
- Include Member Names – this is selected by default; displays the member’s (parents/guardians) name.
- Include Pupil Names – this is selected by default; displays the pupil’s name.
- Order By – specify the list ordering from the drop down menu. Select to either sort by pupil’s names (default) or member’s names.
- Include E-mail – displays the e-mail address of members.
- Include E-mail status – displays the status of the member’s stored e-mail address.
- Okay to send – e-mail address is valid;
- E-mail address invalid – this e-mail address has been marked as invalid. Please check your contact records.
- Member has opted out – the member has unsubscribed their e-mail address from the ClarionCall service or clicked ‘This is Spam’ in their e-mail program.
- Include Mobile – displays the member’s mobile number.
- Include Group Notes – displays any notes entered for the group (if available).
- Include School Notes – displays any notes stored for the pupil (if available).
- Include Home Phone – displays the member’s home phone number (if available).
- Include Home Address – displays the member’s home address (if available).
- Include Priority – displays whether the member is a Primary, Secondary or Unassigned contact.
- Include Space For Comments – provides an extra column, enabling the user to create any required comments.
- Include List of Managers – displays the list of managers allocated to this specific group.
- Include School E-mail / Print Footer – displays the School’s e-mail footer and printed footer.
- Include all other joined groups – displays every group name that the pupil belongs to, other than this specific group.
- Email to? – enter an address to receive a .csv version of the report by e-mail.
4. Once you have set the required options, click the “View Group List” button.
![]()
5. The system will now display an on-screen group list containing contact information, which aligns with the settings you have selected on the previous screen.
6. If you would like to print a copy of the list, click the “print group list” button. Alternatively it is possible to download a .csv version of the group list by clicking the “download CSV” button. Once you are finished with the group list, click the “done” button.


